Students with NG and IP Grades by Department
If an advisor has access to the V3 Navigate Students Enrollment Report, an advisor can create a list of students who have NG or IP as a final grade.
Getting Started:
Login to Navigate.
Click on the Report Icon  , on the left Navigation panel in Navigate, next, click on the Standard Reports Tab, scroll down, and click on Students Enrollment Report.
A new report will open.
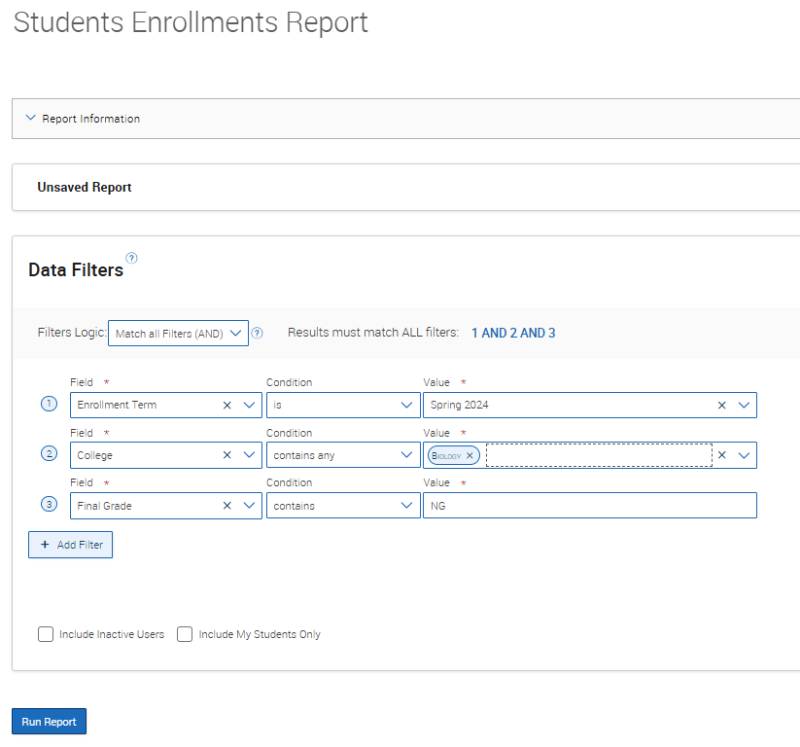
Click on the dropdown field under the "Field" header to start building your list.
- In your "Field" box, scroll down to Enrollment Term.
- Under Condition - defaults to is.
- Under Value - scroll down and choose Term.
- Click on +Add Filter
- In your "Field" box, scroll down to College.
- Under Condition - defaults to contains any.
- Under Value - choose department.
- In your "Field" box, scroll down to Final Grade.
- Under Condition - defaults to contains.
- Under Value - type in NG or IP (you will need to run separate reports for NG and IP).
- Click Run Report. Review the list produced.

Saving your Report
After reviewing the report, if you are satisfied, then SAVE the report by clicking on Save As.

Add the values used in your report in your naming process for easy identification. The report will be stored in your Saved Reports section in your List and Saved Searches section of Navigate.
To access this information, click on the title, and the report showing your chosen parameters will open. Next, click on Run Report this will give you an updated list.
Managing your Columns
After you run the report, you may notice columns of information you do not need in your report.
You can easily remove the unwanted columns using the Column Manager on the Report Results.
When you click on the Column Manager button  , you can uncheck columns of information you do not want to see in your report.


Saving your Search
After reviewing the report, if you are satisfied, then SAVE the report by clicking on Save As.

Add the values used in your report in your naming process for easy identification. The report will be stored in your Saved Reports section in your List and Saved Searches section of Navigate.
To access this information, click on the title, and the report showing your chosen parameters will open. Next, click on Run Report this will give you an updated list.
Communicating with Students:
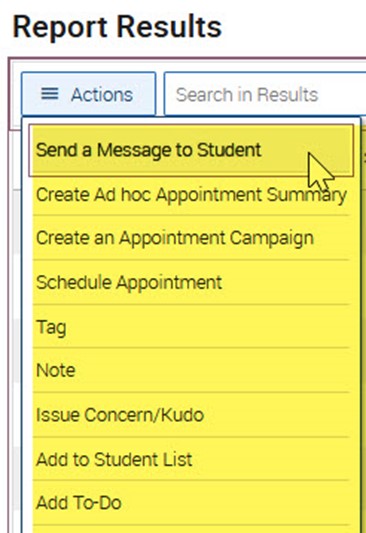
Actions Menu: Once you have a student list, you can communicate with the students on the list in various ways. Review the Actions dropdown list for options.

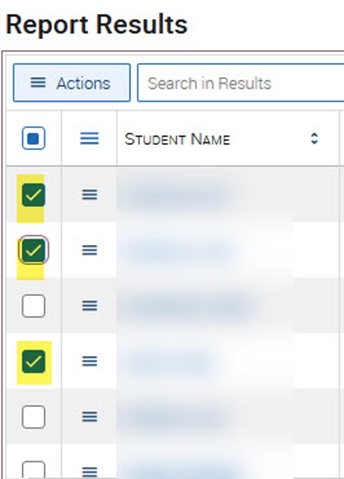
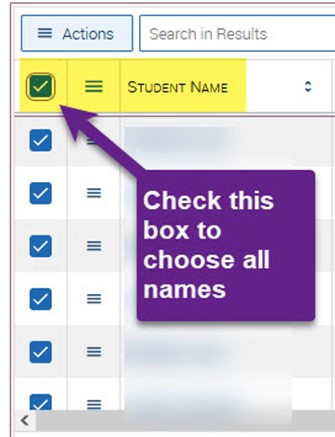
You can check off certain student names and choose an action or check off the All Student option which will include all the the names on your list.


Note: If your list is over 100 students, you need to do one more step to initiate your
action for the full list. Click on  checkmark at bottom of list to select ALL students.
Choosing All Names: On the bottom right of the Report Results, you will see the total number of students your search produced. You will need to click on the Select All option on the left, at the bottom of your report to send your action to ALL THE STUDENTS.

